First Tutorial • Simple Image Editing •
The first tutorial I am going to write for Your Graphic Design will involve editing an image in Adobe Photoshop CS2.
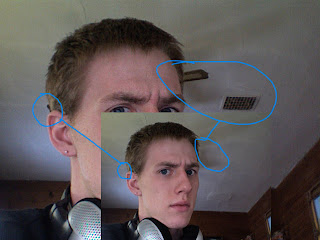
I have started with this photo of me,

NOTE: Before I begin I must tell you that I'm going to assume that you have basic knowledge of Photoshop and will know what I'm talking about. I'll try to be as specific as possible though.
Alright, lets begin!
1.) Open your image, makes sense right?
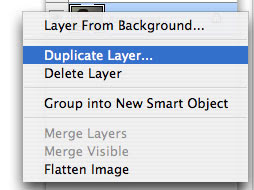
The first thing I like to do is create a duplicate of the original picture layer. You can do this by right clicking the layer and selecting "Duplicate Layer."
 Another option is to click the layer and hit Command+J (CTRL+J on PC) as a shortcut.
Why are you doing this? By duplicating the layer you are working "non-destructively." This means that if you mess the picture up beyond any repair, you can simply delete it and duplicate the original picture layer again and start over.
2.) Now for the tricky stuff.
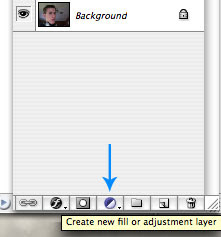
In your layers palette click the "Create New Fill or Adjustment Layer" button and select "Levels..."
 This is the area where I cannot help all that much. The best thing to do is take the middle slider and move it from left to right until the picture looks good, or as good as you can get it.
3.) Click the "Create New Fill or Adjustment Layer" again and select "Curves..."
This is even more tricky than using Levels and will take more time to get a good result. Practice makes perfect though!
You'll notice that there are now two more layers, this is what you want. By using those tools you can double click the little layer thumbnail and easily edit the settings.
NOTE: You can try the other features too if you like, some might help your picture out better than others.
4.) For my picture I duplicated the image again so I could edit out the fan blades coming out of my head.

I used both the "Clone" and "Patch" tools.
 Notice how you can still see the shadows though? I didn't feel like they were too big of a problem so I left them. It'll take some practice to get the patch and clone tool to work how you want it but, once you know how you can do some great things with it. I'm still not the greatest at using them but it's enough for this little project.
5.) This next step is optional but was needed for me. I had to create a new "Levels..." adjustment layer for my hair to appear brighter. I did this adjusting the levels to what I thought looked good for the hair, then painted black on the layer mask to "erase" everything but the hair.
6.) In the original picture you can see my skin doesn't look very nice. I fixed this problem by using the "Blur" tool. Just blur whatever areas you want so the skin will appear to be smoother. You can also use the "Gaussian Blur" filter then set the layer to "Soft Light." I won't go into detail since this is totally up to you to experiment with.
7.) So, in the end my picture looked like this
 You can see my hair is brighter, no more fan or vent, and my eyes are more blue. In the end this is what my layers palette looked like.
  Remember that your results will be different. It all depends on the picture you're working with and how you want it to look in the end. This is not a "do this, do that, step by step" tutorial but just some easy tips and hints that will improve your overall image after you do some tweaking.
Good luck and thanks for reading! Feel free to post any comments.


1 comment:
same sex marriage laws gay gay friend old gay gay beaches
Freeware gay porn
http://men.sexblog.pw/?info.reid
Post a Comment