Car Customization • Lowering Your Car
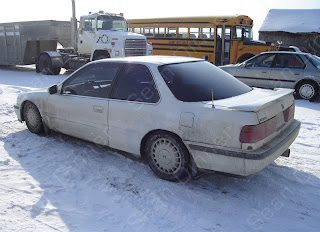
I'll be "Photo-Chopping" my car to look like it has lowered suspension. Here's the original.
1.) Open the image of your car, or just grab one from Google (be warned of copy write laws, don't claim a picture from Google to be your own).
2.) Grab the Lasso Tool and makes a selection of the car (but not the wheels) and the rest of the picture above that. See example. 3.) After doing this (with the picture layer still selected) press Command+J (CTRL+J on PC) or you can go to Layer > New > Layer Via Copy. Using shortcuts makes it a lot easier and quicker to use Photoshop.
4.) It'll create a copy from the picture layer of the area you had selected. Hide the other layers to see the selection.  Don't worry if your selection wasn't smooth around the wheel wells, this will be edited out soon. Just be sure that you have ALL of the car in the selection/new layer.
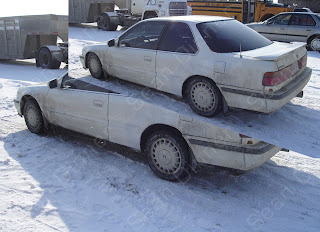
5.) Alright, get the Move Tool (black arrow at the top right of the tool bar, or just press "v") and be sure that your top layer is selected. Using the arrow keys keep pressing down until your car is in a good position and looks realistic. Don't go overboard or else your car will just look ridiculous in the end. You can see mine is now dropped but, there's a problem. We have to edit out all the extra stuff so it looks realistic. I've highlighted in mine where I have to edit.
6.) WARNING: Do NOT use the eraser to erase. As dumb as that sounds, there is a much better way to do it. It's called a "Layer Mask" and allows you to work non-destructively. At the bottom of the layers palette click the square icon with a circle in it to add a layer mask to your layer. 


Remember to crop the image to get rid of the stuff at the top. Since you lowered the top layer down the layers below will show.
Here's a comparision so you can check it out. Or you could open up the original and the final pictures in new windows or tabs, which ever works for you.


No comments:
Post a Comment