Wednesday, February 28, 2007

My Favourite Graphic Design Related sites

It's not much of a list, but it's a list.

1.) Pixel2Life.com
Pixel2Life.com has been my favourite site for last couple of years to visit when in the need of help or just looking for something new to learn. Pixel2Life.com has an insane amount of tutorials available for any program you can think of. They also have a great forum where you can get help from the community, show off your work, criticize others', enter contests, and much more. I suggest checking out Pixel2Life.com.

2.) Good-Tutorials.com
Good-Tutorials.com is another favourite site of mine that offers a huge list of tutorials for Adobe Photoshop. They offer tutorials starting at animation all the way to web layouts.

3.) 13Dots.com
13Dots.com is a graphic design community. A blurb from their site, "... 13dots Community Website where we offer members and guests over 800 FREE learning tutorials, 600 plus quality learning files, Blogs, Topsites, Arcade, Gallery help and much more."
Sounds fun to me!
I'll admit I'm not very active at all on the site but, when and if I get time I'll go check it out so see what's going on. The first thing that drew me to 13 Dots was their contests. 13Dots.com will hold contests where you can win some great prizes. In their latest contest the first prize was a fully licensed copy of Portfolio 8 valued at $199.95, and the second prize awarded was a fully licensed copy of Suitcase Fusion valued at $99.95. Very nice.


So there's my list of Favourite Graphic Design Related Sites. I'm sure I will find more as I cruise the internet seeking knowledge, and they will be added to my list. Thanks for checking out Your Graphic Design!

30 Days of Wallpapers • GrooveArmy.com


As I was cruising around on MyBlogLog.com I came across the site GrooveArmy.com. They're having a "30 Days of Wallpaper" event going on. Everyday, for 30 days, they have a new wallpaper up for download. I thought this was a great idea and they have some awesome wallpapers available for download. Yes, I know I'm just advertising the competition bet hey, these are some cool wallpapers.

Tuesday, February 27, 2007

3D Photo Effect Tutorial by HV-Designs


Now, here's a cool tutorial I found over at HV-Designs where you take a picture of a vehicle or something similar (in their case they used a tank) and make it look like it's jumping out of the picture. Check it out!

My example is above using a picture from CallWalls.com. This site has some amazing wallpapers.

Ah, the Subaru WRX STI, someday you shall be mine.

Vectorized Face Poster


This was a project we did earlier this semester for our Digital Illustration class. We had to take a picture of ourself then use Adobe Illustrator CS2 to "redraw" it on a 10.5x13inch poster.

So, this is what I came up with. It's not the greatest thing you'll ever see. But I feel I did a great job vectorizing my face to look like me. Thanks for looking.

Monday, February 26, 2007

Car Customization • Lowering Your Car

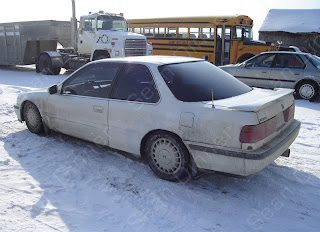
I'll be "Photo-Chopping" my car to look like it has lowered suspension. Here's the original.
1.) Open the image of your car, or just grab one from Google (be warned of copy write laws, don't claim a picture from Google to be your own).

2.) Grab the Lasso Tool and makes a selection of the car (but not the wheels) and the rest of the picture above that. See example.3.) After doing this (with the picture layer still selected) press Command+J (CTRL+J on PC) or you can go to Layer > New > Layer Via Copy. Using shortcuts makes it a lot easier and quicker to use Photoshop.

4.) It'll create a copy from the picture layer of the area you had selected. Hide the other layers to see the selection. Don't worry if your selection wasn't smooth around the wheel wells, this will be edited out soon. Just be sure that you have ALL of the car in the selection/new layer.

5.) Alright, get the Move Tool (black arrow at the top right of the tool bar, or just press "v") and be sure that your top layer is selected. Using the arrow keys keep pressing down until your car is in a good position and looks realistic. Don't go overboard or else your car will just look ridiculous in the end. You can see mine is now dropped but, there's a problem. We have to edit out all the extra stuff so it looks realistic. I've highlighted in mine where I have to edit.
6.) WARNING: Do NOT use the eraser to erase. As dumb as that sounds, there is a much better way to do it. It's called a "Layer Mask" and allows you to work non-destructively. At the bottom of the layers palette click the square icon with a circle in it to add a layer mask to your layer.

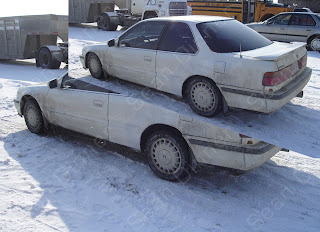
By using the Layer Mask you can "erase" parts of the image, but then can show them again if you want. You do this by selecting the Layer Mask (see above) and using the Brush tool. Black is to erase, white is to un-erase...if that makes sense. This may take a while to do depending on the picture you used. Here's my final...notice the lack of wheel gap? That's what you want! Hope this helps!
Remember to crop the image to get rid of the stuff at the top. Since you lowered the top layer down the layers below will show.

Here's a comparision so you can check it out. Or you could open up the original and the final pictures in new windows or tabs, which ever works for you.

Hex Color Codes

I've just found this site that offers literally thousands of colours and their hex codes. You can find some really cool colours to use when you don't feel like using the basic hex codes. Check out Hex Color Codes.

First Tutorial • Simple Image Editing •

The first tutorial I am going to write for Your Graphic Design will involve editing an image in Adobe Photoshop CS2.
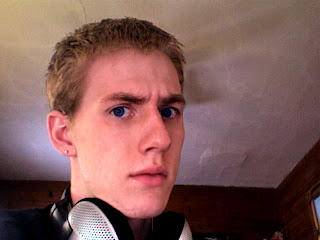
I have started with this photo of me,

and will end with this.
NOTE: Before I begin I must tell you that I'm going to assume that you have basic knowledge of Photoshop and will know what I'm talking about. I'll try to be as specific as possible though.

Alright, lets begin!

1.) Open your image, makes sense right?
The first thing I like to do is create a duplicate of the original picture layer. You can do this by right clicking the layer and selecting "Duplicate Layer." Another option is to click the layer and hit Command+J (CTRL+J on PC) as a shortcut.
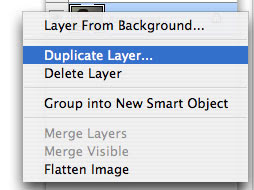
Why are you doing this? By duplicating the layer you are working "non-destructively." This means that if you mess the picture up beyond any repair, you can simply delete it and duplicate the original picture layer again and start over.

2.) Now for the tricky stuff.
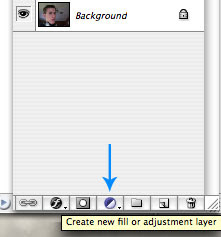
In your layers palette click the "Create New Fill or Adjustment Layer" button and select "Levels..." This is the area where I cannot help all that much. The best thing to do is take the middle slider and move it from left to right until the picture looks good, or as good as you can get it.
3.) Click the "Create New Fill or Adjustment Layer" again and select "Curves..."
This is even more tricky than using Levels and will take more time to get a good result. Practice makes perfect though!

You'll notice that there are now two more layers, this is what you want. By using those tools you can double click the little layer thumbnail and easily edit the settings.

NOTE: You can try the other features too if you like, some might help your picture out better than others.

4.) For my picture I duplicated the image again so I could edit out the fan blades coming out of my head.
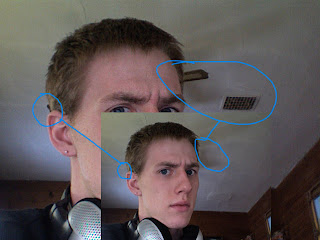
I used both the "Clone" and "Patch" tools. Notice how you can still see the shadows though? I didn't feel like they were too big of a problem so I left them. It'll take some practice to get the patch and clone tool to work how you want it but, once you know how you can do some great things with it. I'm still not the greatest at using them but it's enough for this little project.

5.) This next step is optional but was needed for me. I had to create a new "Levels..." adjustment layer for my hair to appear brighter. I did this adjusting the levels to what I thought looked good for the hair, then painted black on the layer mask to "erase" everything but the hair.

6.) In the original picture you can see my skin doesn't look very nice. I fixed this problem by using the "Blur" tool. Just blur whatever areas you want so the skin will appear to be smoother. You can also use the "Gaussian Blur" filter then set the layer to "Soft Light." I won't go into detail since this is totally up to you to experiment with.

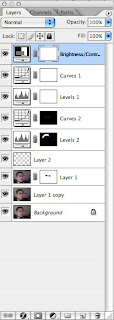
7.) So, in the end my picture looked like thisYou can see my hair is brighter, no more fan or vent, and my eyes are more blue. In the end this is what my layers palette looked like. Remember that your results will be different. It all depends on the picture you're working with and how you want it to look in the end. This is not a "do this, do that, step by step" tutorial but just some easy tips and hints that will improve your overall image after you do some tweaking.

Good luck and thanks for reading! Feel free to post any comments.

Sunday, February 25, 2007

Welcome to Your Graphic Design

Your Graphic Design has been created by Sean Dinner as a place to come to get tips, tricks, and hints on using all of your favourite design programs from Adobe Photoshop to Macromedia Dreamweaver. I'll be showing and reviewing tutorials that alreadys exist as well as showing what I personally have learned and created in class.