Showing posts with label photoshop. Show all posts

Friday, March 9, 2007

Adobe Photoshop CS3 having 2 Versions • Say What?!?


Another interesting email I received today from Adobe. Apparently there will be TWO versions of Photoshop CS3.

The 2 versions are:
• Adobe Photoshop CS3
• Adobe Photoshop CS3 Extended

CS3 will be your "normal" styled Photoshop, with many new great features. The CS3 Extended version though will allow more multimedia abilities, as well as accurate measurement, analysis, and visualization tools. Click to read more.
Adobe seems to be bringing surprise after surprise. Great job Adobe!

Tuesday, March 6, 2007

PayPerPost: Design our New Affiliate Badges

PayPerPost: Design our New Affiliate Badges


A cool contest being held at PayPerPost.

I'm hoping to get some time to throw something together for this.

Saturday, March 3, 2007

Completed Tutorial


So, I ended up starting and finishing the tutorial I had talked about earlier. Here is what I came up with. The above image is a preview, the link will take you to the actual coded layout.

I ended up changing the colours, as you'll see, and I also coded the template using good ol' tables. I know the big thing is to be using CSS, which IS part of this tutorial but, since I know only a little about CSS I just used tables instead and it worked out perfectly. Plus, I soon have to go to work so time is limited.

Full credit of the tutorial goes to Arthura at Pixel2Life.com for the tutorial.

If anyone is looking to create a simple, fast loading site, I suggest checking this tutorial out.

Thanks for reading!

A Great Web Layout Tutorial

I found this tutorial on Pixel2Life.com this morning on creating a pixel styled web layout, slicing, and then coding it. I've just started reading it and already love it. It has tons of pages and pictures but, it's better than having none at all.
After reading through it, and once I get some time of course, I'll have to take a go at creating my own web layout following this tutorial. I'll post my results later.

Thursday, March 1, 2007

My E-Cover Experiment


So after looking through some tutorials and such on how to create e-covers using Photoshop I did some experimenting. Above is what I've created. It's nothing exceptional but, I did find that Photoshop is much easier to use for doing this than Illustrator is. Using Illustrator you can use the 3D Effect and map art to create the 3d box, with Photoshop just use the Perspective Transform tool and it's simple!


The creation on the left side is my desktop screen shot turned 3D (yes, that's a wallpaper from carwalls.com) The other is just a simple 3D box with my name and site name. Thanks for looking! Let me know what you think!

Tuesday, February 27, 2007

3D Photo Effect Tutorial by HV-Designs


Now, here's a cool tutorial I found over at HV-Designs where you take a picture of a vehicle or something similar (in their case they used a tank) and make it look like it's jumping out of the picture. Check it out!

My example is above using a picture from CallWalls.com. This site has some amazing wallpapers.

Ah, the Subaru WRX STI, someday you shall be mine.

Monday, February 26, 2007

Car Customization • Lowering Your Car

I'll be "Photo-Chopping" my car to look like it has lowered suspension. Here's the original.
1.) Open the image of your car, or just grab one from Google (be warned of copy write laws, don't claim a picture from Google to be your own).

2.) Grab the Lasso Tool and makes a selection of the car (but not the wheels) and the rest of the picture above that. See example.3.) After doing this (with the picture layer still selected) press Command+J (CTRL+J on PC) or you can go to Layer > New > Layer Via Copy. Using shortcuts makes it a lot easier and quicker to use Photoshop.

4.) It'll create a copy from the picture layer of the area you had selected. Hide the other layers to see the selection. Don't worry if your selection wasn't smooth around the wheel wells, this will be edited out soon. Just be sure that you have ALL of the car in the selection/new layer.

5.) Alright, get the Move Tool (black arrow at the top right of the tool bar, or just press "v") and be sure that your top layer is selected. Using the arrow keys keep pressing down until your car is in a good position and looks realistic. Don't go overboard or else your car will just look ridiculous in the end. You can see mine is now dropped but, there's a problem. We have to edit out all the extra stuff so it looks realistic. I've highlighted in mine where I have to edit.
6.) WARNING: Do NOT use the eraser to erase. As dumb as that sounds, there is a much better way to do it. It's called a "Layer Mask" and allows you to work non-destructively. At the bottom of the layers palette click the square icon with a circle in it to add a layer mask to your layer.

By using the Layer Mask you can "erase" parts of the image, but then can show them again if you want. You do this by selecting the Layer Mask (see above) and using the Brush tool. Black is to erase, white is to un-erase...if that makes sense. This may take a while to do depending on the picture you used. Here's my final...notice the lack of wheel gap? That's what you want! Hope this helps!
Remember to crop the image to get rid of the stuff at the top. Since you lowered the top layer down the layers below will show.

Here's a comparision so you can check it out. Or you could open up the original and the final pictures in new windows or tabs, which ever works for you.

First Tutorial • Simple Image Editing •

The first tutorial I am going to write for Your Graphic Design will involve editing an image in Adobe Photoshop CS2.
I have started with this photo of me,

and will end with this.
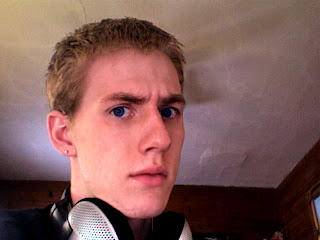
NOTE: Before I begin I must tell you that I'm going to assume that you have basic knowledge of Photoshop and will know what I'm talking about. I'll try to be as specific as possible though.

Alright, lets begin!

1.) Open your image, makes sense right?
The first thing I like to do is create a duplicate of the original picture layer. You can do this by right clicking the layer and selecting "Duplicate Layer." Another option is to click the layer and hit Command+J (CTRL+J on PC) as a shortcut.
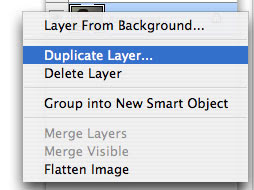
Why are you doing this? By duplicating the layer you are working "non-destructively." This means that if you mess the picture up beyond any repair, you can simply delete it and duplicate the original picture layer again and start over.

2.) Now for the tricky stuff.
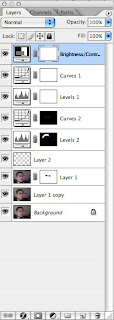
In your layers palette click the "Create New Fill or Adjustment Layer" button and select "Levels..." This is the area where I cannot help all that much. The best thing to do is take the middle slider and move it from left to right until the picture looks good, or as good as you can get it.
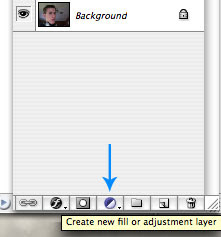
3.) Click the "Create New Fill or Adjustment Layer" again and select "Curves..."
This is even more tricky than using Levels and will take more time to get a good result. Practice makes perfect though!

You'll notice that there are now two more layers, this is what you want. By using those tools you can double click the little layer thumbnail and easily edit the settings.

NOTE: You can try the other features too if you like, some might help your picture out better than others.

4.) For my picture I duplicated the image again so I could edit out the fan blades coming out of my head.
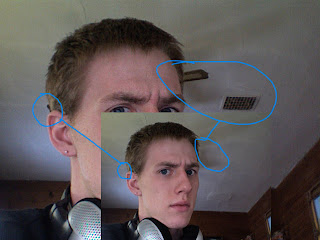
I used both the "Clone" and "Patch" tools. Notice how you can still see the shadows though? I didn't feel like they were too big of a problem so I left them. It'll take some practice to get the patch and clone tool to work how you want it but, once you know how you can do some great things with it. I'm still not the greatest at using them but it's enough for this little project.
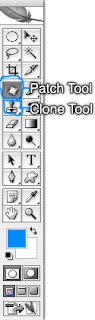
5.) This next step is optional but was needed for me. I had to create a new "Levels..." adjustment layer for my hair to appear brighter. I did this adjusting the levels to what I thought looked good for the hair, then painted black on the layer mask to "erase" everything but the hair.

6.) In the original picture you can see my skin doesn't look very nice. I fixed this problem by using the "Blur" tool. Just blur whatever areas you want so the skin will appear to be smoother. You can also use the "Gaussian Blur" filter then set the layer to "Soft Light." I won't go into detail since this is totally up to you to experiment with.

7.) So, in the end my picture looked like thisYou can see my hair is brighter, no more fan or vent, and my eyes are more blue. In the end this is what my layers palette looked like. Remember that your results will be different. It all depends on the picture you're working with and how you want it to look in the end. This is not a "do this, do that, step by step" tutorial but just some easy tips and hints that will improve your overall image after you do some tweaking.

Good luck and thanks for reading! Feel free to post any comments.

Sunday, February 25, 2007

Welcome to Your Graphic Design

Your Graphic Design has been created by Sean Dinner as a place to come to get tips, tricks, and hints on using all of your favourite design programs from Adobe Photoshop to Macromedia Dreamweaver. I'll be showing and reviewing tutorials that alreadys exist as well as showing what I personally have learned and created in class.